top of page
Freelancer Tutorial
Step By Step Process
The ONYX Freelancer Timesheet System simplifies how freelancers submit and manage session details. Freelancers log in securely, fill out a timesheet, and submit it for student approval. The student receives a link to review and sign the form digitally.
Once signed, the freelancer gets an email with a PDF copy of the completed timesheet for their records. The system tracks the entire process, making it easy to manage, verify, and store timesheets in one place.

Account Generation
The admin will create an account for the freelancer using their email address. The freelancer will then receive a welcome email containing their login credentials, including a pre-generated password (which can be changed later in the Freelancer Settings). They will click the login button in the email to access the login page.

Login & Verification
On the login page, the freelancer will enter their credentials. Upon clicking "Login," a verification code will be sent to their registered email address.

Login & Verification
On the login page, the freelancer will enter their credentials. Upon clicking "Login," a verification code will be sent to their registered email address.

Email Verification
The freelancer will open the email from ONYX, copy the verification code, and return to the platform.

Email Verification
The freelancer will open the email from ONYX, copy the verification code, and return to the platform.

Code Submission
The freelancer will paste the verification code into the input field and click "Login" to complete the authentication process.

Upon successful login, the freelancer will be directed to their dashboard, which includes:
-- Edit Profile
-- Timesheets – to view submitted timesheets
-- Create a Timesheet
The freelancer will begin by clicking Create a Timesheet.
-- Edit Profile
-- Timesheets – to view submitted timesheets
-- Create a Timesheet
The freelancer will begin by clicking Create a Timesheet.

Timesheet Entry
On the Timesheet page, the freelancer will enter the session details along with the student’s email address. Important: Ensure the student's email is correct, as the timesheet link will be sent to them for signing.

Breaks Handling
If the session is less than 8 hours, the Total Breaks input will be disabled.
If the session is 8 hours or more, the Total Breaks input will be enabled and break times will be rounded up in 15-minute increments.
If the session is 8 hours or more, the Total Breaks input will be enabled and break times will be rounded up in 15-minute increments.

Submission Process
After submitting the timesheet, a loading screen will appear showing the progress status (e.g., success or failure of the submission).

Return to Dashboard
Once the process is complete, the freelancer will be redirected to their dashboard. They can now view the timesheet by clicking Timesheets.

Viewing Submitted Timesheets
On the Timesheets page, the freelancer must select all three required filters to query the relevant timesheet.
If the student has not signed the timesheet yet, it will be marked as Pending Student.
If the student has not signed the timesheet yet, it will be marked as Pending Student.

Student Signing Process
The student will receive a link to the timesheet form via email.

Student Signing Process
The student will receive a link to the timesheet form via email.

Student Review & Signature
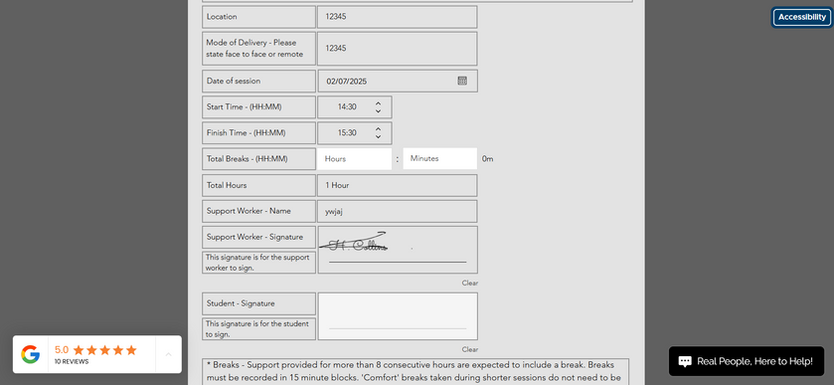
After clicking the link, the student will review the session details. If any information is incorrect, they may contact the admin. Otherwise, they can proceed to sign the form.

Form Submission
Once the student signs, they will scroll to the bottom of the page and submit the form.

Freelancer Notification
The freelancer will receive an email confirming that the student has completed the form.

Freelancer Notification
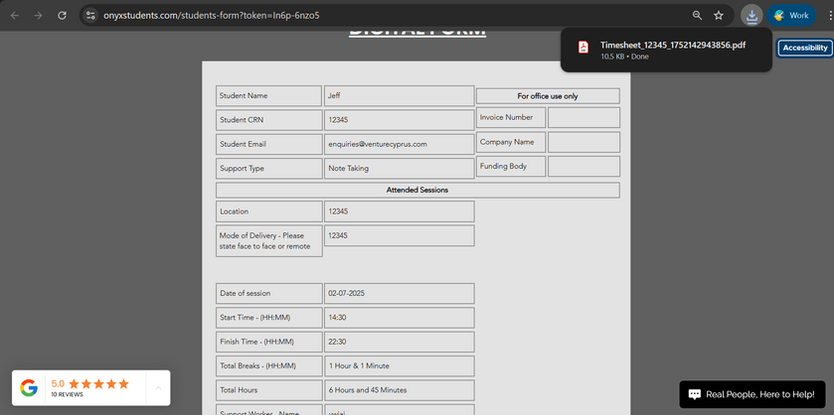
The freelancer can use the link in the email to download the PDF copy for their records.
It’s always recommended to keep a copy for future reference.
It’s always recommended to keep a copy for future reference.

PDF Download
The Student will received a download for the PDF version of the completed form. It is recommended to keep a copy for future reference.

Returning to Timesheets
The freelancer can return to the dashboard and click Timesheets to view the records they've created and signed off on.

Verifying Signed Timesheets
The freelancer can use the link in the email to download the PDF copy for their records.
It’s always recommended to keep a copy for future reference.
It’s always recommended to keep a copy for future reference.

Account Generation
The admin will create an account for the freelancer using their email address. The freelancer will then receive a welcome email containing their login credentials, including a pre-generated password (which can be changed later in the Freelancer Settings). They will click the login button in the email to access the login page.

Login & Verification
On the login page, the freelancer will enter their credentials. Upon clicking "Login," a verification code will be sent to their registered email address.

Login & Verification
On the login page, the freelancer will enter their credentials. Upon clicking "Login," a verification code will be sent to their registered email address.

Email Verification
The freelancer will open the email from ONYX, copy the verification code, and return to the platform.

Email Verification
The freelancer will open the email from ONYX, copy the verification code, and return to the platform.

Code Submission
The freelancer will paste the verification code into the input field and click "Login" to complete the authentication process.

Upon successful login, the freelancer will be directed to their dashboard, which includes:
-- Edit Profile
-- Timesheets – to view submitted timesheets
-- Create a Timesheet
The freelancer will begin by clicking Create a Timesheet.
-- Edit Profile
-- Timesheets – to view submitted timesheets
-- Create a Timesheet
The freelancer will begin by clicking Create a Timesheet.

Timesheet Entry
On the Timesheet page, the freelancer will enter the session details along with the student’s email address. Important: Ensure the student's email is correct, as the timesheet link will be sent to them for signing.

Breaks Handling
If the session is less than 8 hours, the Total Breaks input will be disabled.
If the session is 8 hours or more, the Total Breaks input will be enabled and break times will be rounded up in 15-minute increments.
If the session is 8 hours or more, the Total Breaks input will be enabled and break times will be rounded up in 15-minute increments.

Submission Process
After submitting the timesheet, a loading screen will appear showing the progress status (e.g., success or failure of the submission).

Return to Dashboard
Once the process is complete, the freelancer will be redirected to their dashboard. They can now view the timesheet by clicking Timesheets.

Viewing Submitted Timesheets
On the Timesheets page, the freelancer must select all three required filters to query the relevant timesheet.
If the student has not signed the timesheet yet, it will be marked as Pending Student.
If the student has not signed the timesheet yet, it will be marked as Pending Student.

Student Signing Process
The student will receive a link to the timesheet form via email.

Student Signing Process
The student will receive a link to the timesheet form via email.

Student Review & Signature
After clicking the link, the student will review the session details. If any information is incorrect, they may contact the admin. Otherwise, they can proceed to sign the form.

Form Submission
Once the student signs, they will scroll to the bottom of the page and submit the form.

Freelancer Notification
The freelancer will receive an email confirming that the student has completed the form.

Freelancer Notification
The freelancer can use the link in the email to download the PDF copy for their records.
It’s always recommended to keep a copy for future reference.
It’s always recommended to keep a copy for future reference.

PDF Download
The Student will received a download for the PDF version of the completed form. It is recommended to keep a copy for future reference.

Returning to Timesheets
The freelancer can return to the dashboard and click Timesheets to view the records they've created and signed off on.

Verifying Signed Timesheets
The freelancer can use the link in the email to download the PDF copy for their records.
It’s always recommended to keep a copy for future reference.
It’s always recommended to keep a copy for future reference.
bottom of page
.png)